What's inside
As an Amazon Associate I earn from qualifying purchases. This post may contain affiliate links at no extra cost to you.
The best MIG welder kit for most beginners is a complete 120-volt package with a gas regulator, torch, work lead, starter consumables, and enough adjustment range for 1/8-inch steel; choose a 240-volt dual-voltage kit instead if you regularly weld thicker material or want room to grow.
As an Amazon Associate we earn from qualifying purchases at no extra cost to you.


What we cover
Quick picks by the job
| Situation | Best fit | Why | Likely extras |
|---|---|---|---|
| Small repairs, carts, brackets, and occasional hobby work | Hobart Handler 140 | Simple 120V operation, good low-end control, and a complete beginner-friendly layout | 75/25 gas cylinder, wire, spare tips, helmet, gloves |
| Light fabrication where portability matters | Lincoln Electric Handy MIG | Compact 120V format with flux-cored and gas-shielded capability | Gas bottle, regulator if not included in the selected package, and consumables |
| One machine for home repairs and future projects | Eastwood MIG 180 | Dual-voltage flexibility and a higher maximum output than basic 120V machines | 240V plug or suitable circuit, gas cylinder, wire, and possibly a cart |
| Lowest purchase cost or work away from a gas cylinder | 120V flux-core-capable MIG kit | Can weld outdoors without shielding gas and usually costs less to start | Outdoor-rated flux-core wire, tip cleaner, and better fume ventilation |
Exact package contents vary by model number and retailer, so check the carton or manufacturer specification sheet before buying. A welder advertised as a “kit” may include only the machine, torch, and ground lead rather than everything needed to make a gas-shielded weld.
What a complete MIG kit should include
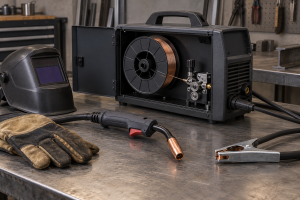
A useful beginner package has five core parts:
- Welding machine: The power source should offer an adjustable voltage and wire-feed range, not just a few coarse settings.
- MIG torch: Look for a replaceable contact tip, a standard threaded nozzle, and a torch lead of roughly 8 to 10 feet. A shorter lead is easier to store; a longer lead gives more reach around a vehicle or workbench.
- Work lead and clamp: A substantial clamp with clean jaws is preferable to a small, weak spring clamp. The lead should be long enough to position the work without pulling the machine.
- Regulator and gas hose: For solid wire, the kit needs a pressure regulator or flowmeter, hose, and the correct cylinder connection. A flowmeter is easier to set accurately than a pressure-only regulator.
- Starter consumables: Useful inclusions are a spool of wire, contact tips, a nozzle, and sometimes an anti-spatter product. These parts are inexpensive, but missing them can prevent immediate setup.
Also check whether the package includes a power plug. Some dual-voltage welders include a 120V plug but require the buyer to fit or supply a 240V plug and suitable receptacle arrangement. Do not improvise an extension or adapter for a high-current circuit.
Head-to-head: three sensible beginner choices
Hobart Handler 140: the uncomplicated 120V choice
The Hobart Handler 140 is rated at 25–140 amps and operates from a 120V supply. Its published duty cycle is 20% at 90 amps, meaning it can weld for two minutes in a ten-minute period at that rated load before cooling. It is intended for mild steel and similar light fabrication rather than continuous heavy production.
Its appeal is the straightforward setup: a conventional torch, work cable, gas connection, and flux-cored option. It is a strong choice for gates, repair tabs, sheet-metal projects, and tubing up to the practical limits of a 120V machine. A typical package may include a regulator and hose, but verify this because package contents differ.
The limitation is electrical headroom. At maximum output, a 120V machine is not the ideal tool for repeated welds on 1/4-inch steel. It may complete occasional joints with correct preparation and multiple passes, but a 240V machine will be less frustrating.
Lincoln Electric Handy MIG: compact and approachable
The Lincoln Electric Handy MIG is a small 120V machine with a published output range of approximately 25–125 amps, depending on the version. It supports gas-shielded solid wire and self-shielded flux-core wire, making it useful where a cylinder is inconvenient.
This type of package suits a homeowner who values storage space and simple controls. It is easier to carry to a driveway or small workshop than a larger dual-voltage unit. The trade-off is lower output and a shorter duty cycle than many 180-amp machines. Treat it as a light-duty fabricator, not a substitute for a shop welder.
Eastwood MIG 180: the upgrade for mixed projects
The Eastwood MIG 180 is a dual-voltage machine with a published maximum output of 180 amps. Its 120V setting is convenient for ordinary outlets, while 240V operation provides more useful capacity for thicker steel and longer welds. Depending on the package, it may support solid wire, flux core, and spool-gun use.
This is the better direction for a buyer who expects to build workbenches, repair trailers, weld heavier brackets, or keep the machine for many years. The extra capability comes with more setup decisions: input voltage, circuit capacity, wire diameter, gas flow, and machine settings all matter. It also tends to be larger and more expensive than a basic 120V kit.
| Machine | Input | Published output range or maximum | Typical wire options | Best practical use |
|---|---|---|---|---|
| Hobart Handler 140 | 120V | 25–140A; 20% duty cycle at 90A | 0.023–0.035 in solid; flux core by setup | Light repairs and home fabrication |
| Lincoln Electric Handy MIG | 120V | About 25–125A, version dependent | 0.025 in solid; small-diameter flux core | Compact, occasional projects |
| Eastwood MIG 180 | 120/240V | Up to 180A | Commonly 0.023–0.035 in solid and flux core | Broader project range and thicker material |
Gas setup: the cost and parts beginners overlook
For clean indoor welds on mild steel, use ER70S-6 solid wire with a 75% argon/25% carbon-dioxide shielding-gas mix. A small 20-cubic-foot cylinder is portable but runs out quickly. A 40-cubic-foot cylinder is a more useful home size, while an 80-cubic-foot bottle reduces refill frequency but is heavier and costs more to fill.
A practical starting flow rate is 20–25 cubic feet per hour indoors, adjusted for drafts and nozzle size. At 20 CFH, a nominal 40-CF cylinder contains about two hours of gas at the stated flow, before allowing for residual pressure and imperfect usage. In real projects, trigger time is intermittent, so that may represent several short sessions rather than two continuous hours.
Budget separately for the cylinder deposit or purchase, first fill, regulator, hose, solid wire, contact tips, and a nozzle. A gas-ready kit can still require roughly $150–$350 in accessories, depending on cylinder arrangements and tool quality. Flux core avoids cylinder costs but creates more smoke, spatter, and slag, and it is more sensitive to incorrect polarity.
What you still need beyond the welder
- Auto-darkening welding helmet with an appropriate shade range
- Leather welding gloves, cotton or flame-resistant clothing, and closed leather footwear
- Ventilation or local fume extraction; never weld coated, galvanized, or painted material without proper preparation and controls
- Angle grinder, flap discs, grinding discs, and a wire brush
- Clamps, magnets, a steel ruler, and a chipping hammer for flux core
- 0.023-inch or 0.030-inch contact tips matched to the wire
- Spare nozzles, nozzle gel or anti-spatter compound, and replacement liner if the torch becomes difficult to feed
- A dedicated circuit and a properly rated extension lead if an extension is unavoidable
Setup sequence that prevents common problems
- Identify the wire process. Solid wire with gas and flux-core wire do not always use the same polarity. Follow the machine diagram rather than assuming the factory setting is correct.
- Fit the drive-roll groove. Match the roll to the wire diameter. A 0.030-inch wire in the wrong groove can slip, flatten, or feed unevenly.
- Install the correct contact tip. The tip should match the wire size and should not grip the wire tightly as it passes through.
- Connect the gas carefully. Secure the cylinder upright, inspect the hose, open the cylinder valve slowly, and set flow only while gas is actually passing through the torch.
- Clean the steel. Remove rust, oil, paint, and mill scale from the joint area. Contamination causes porosity and makes a beginner blame the machine for a preparation problem.
- Make a test weld on scrap of the same thickness. Listen for a consistent arc, check penetration on the reverse side, and adjust voltage and wire speed together.
Durability and ownership realities
The parts that usually wear first are contact tips, nozzles, drive-roll surfaces, torch liners, and ground-clamp jaws. Spatter can partially block a nozzle; forcing wire through a kinked liner can overload the drive motor; and a dirty work clamp can produce an unstable arc. Keep the liner reasonably straight, brush the nozzle regularly, and cut wire cleanly before feeding it.
For occasional home use, a simple 120V kit is often more valuable than a high-output machine that requires a new circuit and remains difficult to store. For frequent projects, the extra cost of dual voltage pays back through better duty cycle, thicker-material capability, and less temptation to exceed a small machine’s limits. Choose the kit whose included torch, regulator, leads, and consumables match your first project—and verify every missing part before placing the order.