What's inside
- When aluminium stick welding makes sense
- What equipment and electrodes are required?
- AC or DC: which polarity should you use?
- Preparation determines whether the weld works
- How to weld aluminium with a stick welder
- Common failure points and their causes
- Is aluminium stick welding cheaper than buying better equipment?
- Can you weld aluminium without a welder?
- Bottom line
- Related Guides
- When aluminium stick welding makes sense
- What equipment and electrodes are required?
- AC or DC: which polarity should you use?
- Preparation determines whether the weld works
- How to weld aluminium with a stick welder
- Common failure points and their causes
- Is aluminium stick welding cheaper than buying better equipment?
- Can you weld aluminium without a welder?
- Bottom line
- Related Guides
As an Amazon Associate I earn from qualifying purchases. This post may contain affiliate links at no extra cost to you.
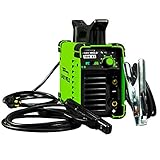
Yes, you can weld aluminium with a stick welder, but it is a specialist repair method with narrow practical limits: use aluminium SMAW electrodes, a machine capable of AC or DCEP output, very clean material, and expect more slag, porosity, and distortion than with TIG or a spool-gun MIG setup.
As an Amazon Associate we earn from qualifying purchases at no extra cost to you.

What we cover
- When aluminium stick welding makes sense
- What equipment and electrodes are required?
- AC or DC: which polarity should you use?
- Preparation determines whether the weld works
- How to weld aluminium with a stick welder
- Common failure points and their causes
- Is aluminium stick welding cheaper than buying better equipment?
- Can you weld aluminium without a welder?
- Bottom line
- Related Guides
When aluminium stick welding makes sense
Aluminium stick welding is most useful for a short, non-critical repair where portability and low equipment cost matter more than appearance. It can work on relatively thick aluminium plate, castings, brackets, and agricultural or marine repairs when the joint can tolerate a rougher finish and some grinding.
It is a poor choice for thin sheet, visible cosmetic work, long production welds, leak-tight precision assemblies, or highly loaded parts such as lifting eyes and structural vehicle components. The process is difficult because aluminium conducts heat rapidly, the electrode coating melts into a large slag layer, and the bright puddle makes it hard to judge fusion.
What equipment and electrodes are required?
- Welder: an AC-capable transformer or inverter stick welder, or a DC machine that provides DCEP (electrode positive). Do not assume that every DC stick machine will run aluminium electrodes successfully.
- Electrodes: aluminium SMAW rods, commonly classified as E4043-type electrodes. Follow the specific manufacturer’s polarity and current instructions; aluminium rods are not interchangeable with ordinary steel 6013 or 7018 electrodes.
- Electrode holder and leads: use leads rated for the machine’s maximum current and keep connections tight. Aluminium rods are often run at high amperage for their diameter.
- Cleaning tools: a dedicated stainless-steel brush, scraper, acetone or another suitable degreaser, and a clean lint-free cloth.
- Protection: a properly rated welding helmet, leather gloves, flame-resistant clothing, ventilation, and protection from sparks and hot slag.
| Aluminium electrode size | Typical current range* | Useful material thickness | Practical comment |
|---|---|---|---|
| 2.5 mm | 50–80 A | About 3–5 mm | Least demanding option, but still difficult to control |
| 3.2 mm | 80–120 A | About 5–8 mm | General repair size for a capable machine |
| 4.0 mm | 110–160 A | About 8 mm and thicker | High heat input and difficult on small machines |
*These are planning ranges, not universal settings. The electrode packaging takes priority, and many aluminium stick rods require AC or DCEP rather than DCEN.
AC or DC: which polarity should you use?
Aluminium stick electrodes commonly run on AC or DCEP, with the correct choice depending on the rod design. DCEP places more heat at the electrode and can produce a steadier arc on some products. AC can help reduce arc blow and is required by certain electrodes or older transformer machines. DCEN is generally unsuitable unless the electrode manufacturer specifically permits it.
Check three things before striking an arc:
- Whether the rod is rated for AC, DCEP, or both.
- The recommended amperage for its diameter.
- The minimum open-circuit voltage and duty cycle required by the electrode instructions.
A small hobby welder may advertise a high peak current but still struggle if its duty cycle, arc-starting behavior, or open-circuit voltage is inadequate. For occasional repairs, a machine with roughly 160–200 A maximum output gives more useful headroom than a unit that reaches 120 A only under ideal conditions.
Preparation determines whether the weld works
Aluminium forms a tenacious oxide layer that melts at a much higher temperature than the base metal. Oil, paint, moisture, and oxide contamination then create porosity and incomplete fusion. Preparation is therefore not optional.
- Identify the alloy if possible. Some cast and highly alloyed aluminium grades are difficult or crack-prone to weld. Avoid treating an unknown, heavily contaminated casting as a simple repair.
- Remove coatings and dirt. Grind or scrape away paint, anodizing, sealant, and corrosion at least 25 mm on both sides of the joint. Degrease after mechanical cleaning.
- Use a dedicated stainless brush. Brush immediately before welding and do not use that brush on steel, which can transfer contaminants.
- Fit the joint tightly. Use a small root gap and solid clamps. Excessive gaps demand more filler and increase burn-through and distortion.
- Preheat thick sections carefully. Around 90–120°C can improve puddle flow on heavy aluminium, but use temperature-indicating crayons or a thermometer rather than guessing. Never use uncontrolled red heat.
- Dry the electrodes. Moisture in the coating promotes porosity and hydrogen-related defects. Follow the manufacturer’s storage and rebaking instructions; do not bake unknown rods at a guessed temperature.
How to weld aluminium with a stick welder
- Set up for short welds. Aluminium stick welding is easier as a series of short beads than as one long continuous pass. Arrange the work so you can maintain a comfortable torch-hand position and see the joint.
- Start near the upper end of the recommended range. Aluminium pulls heat away quickly, and too little current causes sticking and a cold bead. If the puddle becomes wide and uncontrollable, reduce current or shorten the weld rather than simply moving faster.
- Hold a short arc. Keep the electrode close to the puddle, generally around 2–3 mm. A long arc increases spatter, porosity, and arc instability.
- Drag the rod slightly. A modest drag angle helps keep the coating and slag behind the molten pool. Avoid a wide weaving motion; a narrow stringer bead is easier to control.
- Watch the edges of the puddle. The surface may look shiny before the joint edges have fused. Pause briefly at each side without dwelling long enough to collapse the edge.
- Break frequently. Deposit approximately 25–50 mm at a time, then stop and allow the part to cool until the puddle is controllable. Stagger the welds on opposite sides where possible to reduce distortion.
- Remove slag between passes. Let the bead cool enough to handle, then chip and brush it thoroughly. Trapped slag can resemble a solid bead while hiding a serious lack of fusion.
- Inspect and grind conservatively. Look for wormholes, black soot, cracks, undercut, trapped slag, and unfused edges. Do not grind away a defect and assume the joint is sound; remove the defective area and reweld if the part is important.
Common failure points and their causes
| Symptom | Likely cause | Correction |
|---|---|---|
| Electrode sticks repeatedly | Current too low, wrong polarity, damp rod, or poor arc length | Verify polarity, increase current within the rod’s range, and use dry electrodes |
| Large black holes or pinholes | Oil, moisture, oxide, long arc, or contaminated rod | Reclean the joint, shorten the arc, and improve storage |
| Bead sits on top | Insufficient heat, excessive travel speed, or heavy oxide | Increase heat carefully, slow down, and brush immediately before welding |
| Edges melt away | Too much heat or dwelling at the toes | Use shorter beads, reduce current, and alternate sides |
| Slag is trapped | Inadequate cleaning or a wide, irregular bead | Chip and brush every pass; use narrow stringers |
| Cracking after cooling | Unsuitable alloy, excessive restraint, or an incompatible filler | Stop and reassess the alloy, joint design, and filler selection |
Is aluminium stick welding cheaper than buying better equipment?
The rods may cost roughly $15–$40 per small package, depending on diameter and brand, but consumption is not the whole cost. Difficult starts, failed beads, grinding, and repeated cleaning can make a simple repair consume several electrodes. For a one-off thick repair, that can still be less expensive than purchasing a TIG machine or a spool-gun MIG system. For repeated aluminium work, however, the higher productivity and cleaner results of a spool-gun MIG setup or AC TIG machine usually justify the investment.
A useful decision rule is:
- One occasional repair, thick material, rough appearance acceptable: aluminium stick electrodes may be reasonable.
- Several repairs per month: consider a spool-gun MIG welder for speed and easier arc control.
- Thin sheet or neat visible joints: use AC TIG or a suitable aluminium MIG setup instead.
- Safety-critical, pressure-containing, or load-bearing part: use an appropriately qualified welding procedure and a professional welder.
Can you weld aluminium without a welder?
You cannot make a true fusion weld without a suitable heat source, but you can join aluminium by other methods. Aluminium brazing rods used with a propane or MAPP-gas torch may work for small, lightly loaded repairs when the product is intended for the alloy and joint size. Rivets, bolts, structural adhesives, and mechanical sleeves are often better choices when the parent metal is thin or heat-sensitive.
A torch-brazed joint is not automatically equivalent to a welded joint. It may have lower strength, different corrosion behavior, and limited temperature resistance. Clean fit-up and a large overlap are particularly important. For anything supporting people, containing pressure, carrying significant loads, or exposed to vibration, choose a qualified welding or fabrication method rather than relying on an improvised repair.
Bottom line
Aluminium stick welding is possible, but it is a compromise rather than a general-purpose aluminium process. Choose the correct aluminium electrode, confirm AC or DCEP compatibility, clean aggressively, control heat with short beads, and remove every trace of slag between passes. If the work is thin, cosmetic, frequent, or safety-critical, an aluminium-capable MIG or AC TIG setup is usually the more reliable ownership decision.