What's inside
- Start with the job, not the machine
- MIG: the most forgiving first welding machine
- Stick: the rugged choice for outdoor and thick-steel work
- TIG: maximum control, minimum beginner forgiveness
- Power requirements: match the machine to the circuit
- How to choose in four steps
- Durability and maintenance realities
- What was the first welding machine invented?
- Final recommendation
- Start with the job, not the machine
- MIG: the most forgiving first welding machine
- Stick: the rugged choice for outdoor and thick-steel work
- TIG: maximum control, minimum beginner forgiveness
- Power requirements: match the machine to the circuit
- How to choose in four steps
- Durability and maintenance realities
- What was the first welding machine invented?
- Final recommendation
As an Amazon Associate I earn from qualifying purchases. This post may contain affiliate links at no extra cost to you.
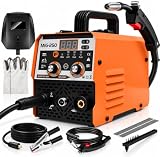
The best first welding machine for most beginners is a compact 120/240-volt MIG welder, because it has the shortest learning curve and handles common steel projects with less cleanup than stick or TIG. Choose stick instead for outdoor repair and thick steel, or TIG when precise, clean welds on thin steel, stainless steel, or aluminum matter more than speed.
As an Amazon Associate we earn from qualifying purchases at no extra cost to you.


What we cover
- Start with the job, not the machine
- MIG: the most forgiving first welding machine
- Stick: the rugged choice for outdoor and thick-steel work
- TIG: maximum control, minimum beginner forgiveness
- Power requirements: match the machine to the circuit
- How to choose in four steps
- Durability and maintenance realities
- What was the first welding machine invented?
- Final recommendation
Start with the job, not the machine
A welder’s advertised amperage is only one part of the decision. Before comparing models, identify the metal you will weld, its thickness, your available electrical supply, and whether you will work indoors or outdoors. A woodworking shop may need a machine for making steel table bases, brackets, carts, and tool stands; a farm or trailer owner may prioritize outdoor repair and portability.
| Situation | Best first choice | Why | Main compromise |
|---|---|---|---|
| Indoor shop projects using mild steel, 1/8 to 1/4 inch | 120/240V MIG | Easy arc starting, fast welds, simple wire feeding | Needs shielding gas for the cleanest results |
| Outdoor repairs or work in a drafty space | Inverter stick | Flux coating shields the arc without a gas cylinder | More spatter and a steeper learning curve |
| Thin sheet, visible welds, stainless steel, or aluminum | TIG | Excellent control and clean, precise beads | Slowest and hardest technique to learn |
| Limited household power | 120V MIG or compact stick | Runs from a standard 15- or 20-amp circuit | Lower output and reduced duty cycle |
| Frequent work on thicker steel | Dual-voltage MIG or stick | 240V operation provides more usable output | Higher purchase cost and heavier setup |
MIG: the most forgiving first welding machine
MIG, or gas metal arc welding, feeds a continuously melting wire through a gun. A shielding gas—usually a carbon-dioxide and argon mixture for mild steel—protects the molten weld pool from contamination. The operator mainly controls gun angle, travel speed, and distance from the work.
For a first MIG machine, look for:
- 120/240V dual-voltage input if your budget permits.
- At least 90 to 140 amps on 120V for light fabrication.
- A useful 240V output of roughly 180 to 220 amps for 1/4-inch steel in multiple passes.
- A 20- to 25-foot-per-minute wire-feed range and a standard 0.023- to 0.030-inch mild-steel wire setup.
- A duty cycle of about 20 percent at 90 amps for hobby work, or 30 to 40 percent at higher output for frequent fabrication.
MIG is suitable for steel shelving, welding tables, brackets, garden gates, carts, and furniture frames. It is less convenient outdoors because wind can blow away shielding gas. Flux-cored wire can solve that problem, but it creates more smoke and slag and requires polarity and wire-selection changes.
MIG consumable costs and ownership
A 2-pound spool of solid steel wire may cost roughly $10 to $20, while an 11-pound spool commonly falls in the $30 to $60 range. A small refillable shielding-gas cylinder, regulator, contact tips, nozzles, and anti-spatter supplies add to the initial cost. Contact tips and nozzles are usually the first MIG parts to wear, especially when spatter blocks the nozzle or the tip is allowed to touch the work.
As a practical example, suppose a hobbyist uses 0.5 pound of wire per project. At $45 for an 11-pound spool, the wire costs about $2.05 per project. Add approximately $1 to $3 for shielding gas and tip or nozzle wear, and a typical small project consumes around $3 to $5 in consumables, excluding electricity and metal.
Stick: the rugged choice for outdoor and thick-steel work
Stick welding uses flux-coated electrodes that are consumed as you weld. The flux produces shielding gas and a protective slag layer, so there is no separate gas cylinder to transport. That makes an inverter stick machine attractive for outdoor repairs, gates, trailers, agricultural equipment, and rusty or painted steel after proper cleaning.
A beginner-friendly stick machine should provide approximately 20 to 160 amps on 120V or 240V, accept common 1/8-inch 6011 and 6013 electrodes, and include adjustable arc control or hot start. A 6013 electrode is often easier for clean mild-steel practice, while 6011 penetrates well and is more tolerant of less-than-perfect surfaces.
Stick has a longer learning curve than MIG. You must strike and maintain an arc, keep a short arc length, control travel speed, and chip slag between passes. Electrodes absorb moisture, which can cause unstable arcs and porous welds, so store them in a dry container and follow the electrode manufacturer’s storage instructions.
The consumable calculation is different from MIG. If a 5-pound box of electrodes costs $15 to $25 and a small project uses 1.5 pounds, the electrode cost is approximately $4.50 to $7.50. Stick may therefore cost more per finished small weld, but it avoids gas-cylinder rental, refilling, and wind-related shielding problems.
TIG: maximum control, minimum beginner forgiveness
TIG uses a nonconsumable tungsten electrode and a separate filler rod. The operator controls the arc with a torch and adds filler independently, often with a foot pedal or fingertip control. The process can produce the neatest welds, but it demands two-hand coordination, careful cleaning, and slower travel.
Choose TIG first only if your projects justify the learning curve. It is a strong option for thin sheet metal, stainless-steel panels, precision brackets, visible furniture details, and aluminum. A basic DC TIG machine welds steel and stainless steel; aluminum requires AC TIG, which is typically more expensive and may need a 240V circuit.
For a first TIG-capable machine, prioritize high-frequency or lift-arc starting, adjustable amperage, post-flow gas control, and a stable low-amperage range. A useful beginner specification is roughly 10 to 180 amps, although actual output depends on the input voltage and duty cycle. Expect to buy tungsten electrodes, collets, cups, filler rods, and argon. The consumable cost per weld can be modest, but setup and gas use are usually higher than with MIG.
Power requirements: match the machine to the circuit
A 120V machine is convenient for a garage, but it draws substantial current near its maximum output. A 120V welder rated at 20 amps should be used on an appropriate dedicated circuit rather than a long, lightweight extension cord. Voltage drop can cause poor arc performance and overheated wiring.
240V machines generally deliver more consistent power for 1/4-inch steel and thicker work. Check the welder’s required breaker size, plug configuration, and duty cycle before buying. Never assume that a machine advertised as “200 amps” can produce that output continuously; a rating may apply only at 20 or 25 percent duty cycle.
How to choose in four steps
1. Measure your typical material
For 18-gauge to 1/8-inch mild steel, a small MIG machine is usually sufficient. For 1/4-inch plate, favor dual-voltage MIG or stick and plan on beveling the joint and making multiple passes. For very thin sheet, prioritize low-amperage control rather than the highest maximum amperage.
2. Decide whether gas is practical
If you work indoors and can store a cylinder upright, gas MIG or TIG offers cleaner results. If you weld outside, move equipment often, or want the simplest logistics, stick or self-shielded flux-core MIG may be more practical.
3. Budget for the complete setup
General market ranges in 2026 are approximately $180 to $450 for a basic hobby MIG or stick machine, $400 to $1,000 for a more capable dual-voltage MIG, and $300 to $1,500 or more for TIG depending on AC capability and controls. Include a helmet, gloves, jacket, clamps, wire brush, grinder, regulator, gas cylinder, and ventilation in the budget.
4. Buy for your next two years of work
A machine that barely meets today’s needs can become frustrating when you build a heavier workbench or repair thicker steel. Conversely, an oversized industrial machine may waste money and shop space. For most home fabricators, a dual-voltage MIG with flux-core capability provides the broadest starting range.
Durability and maintenance realities
Keep the machine dry, allow its fan to run after heavy welding, and do not block ventilation openings. Clean MIG liners when wire feeding becomes erratic, replace contact tips when the wire hole enlarges, and keep the gun nozzle free of spatter. On stick machines, inspect electrode and work leads for damaged insulation and maintain clean ground-clamp contact.
Many beginner problems are setup problems rather than machine defects: incorrect polarity, damp electrodes, dirty steel, insufficient shielding gas, excessive wire-feed speed, or an undersized extension cord. Practice on clean scrap of the same thickness as your project and make a few destructive test welds before trusting a structural joint.
What was the first welding machine invented?
The history is not one single invention. Humphry Davy demonstrated an electric arc in 1800, establishing the principle behind arc welding. Nikolai Benardos developed a practical carbon-electrode arc-welding process in the 1880s, and Nikolai Slavyanov later advanced welding with a consumable metal electrode. Modern MIG, stick, and TIG machines evolved from these earlier arc-welding systems through improvements in power electronics, shielding gases, electrodes, and wire feeding.
Final recommendation
Choose a 120/240V MIG machine with flux-core capability if you want one first welding machine for general indoor projects, furniture frames, brackets, and shop fabrication. Choose an inverter stick machine when outdoor access and thick steel matter most. Choose TIG only when thin, stainless, aluminum, or appearance-critical work makes precise control worth the extra equipment and practice.