What's inside
As an Amazon Associate I earn from qualifying purchases. This post may contain affiliate links at no extra cost to you.
What we cover
Best Auto-Darkening Welding Helmets: Compare Lens Features
The best auto-darkening welding helmet is the lightest model with a clear, correctly sized lens and a shade range suited to your process—not necessarily the one with the largest viewing area or the most sensors. For occasional stick or MIG work, a dependable fixed-shade lens can be enough; for frequent welding, TIG, or work in changing light, prioritize low-amp performance, clear optics, and adjustable controls.
Compare the features that affect your choice
The figures below are representative specifications for established helmet families, not a promise that every version or regional configuration is identical. Confirm the exact lens, shade range, weight, and included features on the manufacturer’s current product sheet before buying. Shade numbers are dark-state ranges unless noted.
As an Amazon Associate we earn from qualifying purchases at no extra cost to you.
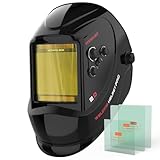
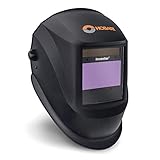


| Helmet or lens family | Shade range | Viewing area | Switching time | Approx. weight | Best fit |
|---|---|---|---|---|---|
| Lincoln Electric Viking 3350 | 5–13 | 3.74 × 3.34 in | 1/25,000 sec | About 1.4 lb | Large view and frequent shop use |
| ESAB Sentinel A50 | 5–13 | 3.93 × 2.36 in | 1/25,000 sec | About 1.4 lb | Wide, rectangular view and adjustable controls |
| 3M Speedglas 9100 series | Typically 5, 8–13, depending on lens | About 2.8 × 4.2 in on common configurations | Varies by lens; some are about 1/10,000 sec | Varies by shell and configuration | Users who want a configurable professional system |
| Hobart Endeavor series | Commonly 9–13 | About 3.94 × 2.36 in | About 1/25,000 sec | About 1.5 lb | General-purpose MIG and stick welding |
Weights and dimensions are rounded because shell, headgear, and lens variants can change them. The table is a short list of comparison points, not a ranking: fit, replacement-lens availability, and the exact lens version matter as much as headline specs.
Choose by welding process and work pattern
- Occasional MIG or stick: A mid-priced helmet with a 9–13 dark range, adjustable sensitivity, and a standard replacement cover lens is usually practical. You may not benefit from paying extra for a panoramic view if most work is on a bench.
- Low-amperage TIG: Check the manufacturer’s stated TIG detection capability and minimum operating current, not just the number of arc sensors. Low-current starts can be harder to detect, especially if your hands, torch, or workpiece obstruct sensors. Sensitivity adjustment and a stable fit help.
- Frequent welding or long sessions: Give extra weight to headgear comfort, balance, and lens clarity. A larger window is useful when tracking a joint, but it can add bulk and expose more cover lens to spatter and scratches.
- Overhead or cramped-position work: Consider a compact shell, secure headgear, and a clear view at the angle you actually weld. A helmet that slips or catches on nearby equipment can be more troublesome than a slightly smaller lens.
- Shared shop or mixed processes: Favor easy-to-reach shade, delay, and sensitivity controls, plus a shade range that covers your processes. Check that the helmet’s operating instructions give a suitable shade for each process and current.
What the lens numbers do—and don’t—tell you
Shade range
A wider shade range gives you more adjustment options, but it does not automatically make a helmet safer or better. Set the dark shade to the value recommended for your process, electrode or wire, and welding current; do not choose a shade by brightness preference alone. Many auto-darkening lenses provide a light state around shade 3 or 4 for setup and inspection, but confirm the stated light shade for the exact model.
Clarity and color
Optical clarity is often rated on a four-part scale: optical class, light diffusion, luminous transmittance variation, and angle dependence. A rating of 1/1/1/1 is the strongest rating on that scale. It can help reduce visual distortion, but does not guarantee that a lens will look equally natural to every user. Color-balanced lenses may make the work area appear less green, which some welders find helpful when positioning a torch or inspecting a bead.
Reaction time and sensors
Switching times such as 1/25,000 second describe how quickly a lens changes from light to dark under specified conditions. Faster is a useful specification, but it is not a substitute for proper shade selection, a functioning lens, or a well-positioned helmet. Four sensors can improve detection when the arc is partially blocked, but sensor count alone does not establish reliable performance in every position. Check the manual for limitations and test the lens using the maker’s procedure before work.
Viewing area and weight
A wide lens helps you see more of the joint without moving your head. Compare both dimensions: a wide-and-short window and a taller window serve different sight lines. Helmet weight also understates how comfortable a setup feels; balance, headgear adjustment, and how far the lens sits from your face affect strain. If possible, try the helmet with your usual safety glasses and any respirator you wear.
Set up the helmet before striking an arc
- Read the manual and inspect the lens. Check that the lens, cover plates, and shell are installed correctly and free of cracks or damage.
- Select the correct shade. Use the manufacturer’s chart for your process and current. If you change from MIG to TIG or change amperage, reassess the setting rather than assuming one shade suits everything.
- Adjust sensitivity and delay. Increase sensitivity if the lens misses low-current starts, following the manual. Delay controls how long the lens stays dark after the arc stops; a longer delay can be more comfortable for high-current work.
- Check fit and coverage. Lower the helmet and make sure it stays in position, gives adequate face and neck coverage, and does not block your view of the joint.
- Verify operation as directed. Use the maker’s recommended test method. Do not treat a phone camera or a quick glance at a bright light as a reliable safety test.
Ownership costs and common wear points
The shell may last for years, but cover plates are consumables: spatter, smoke residue, and scratches gradually reduce visibility. Replace a dirty or damaged outer cover rather than trying to compensate by increasing sensitivity. Keep the lens and sensors clean as directed, and avoid solvents or abrasive cloths unless the manufacturer approves them. Sweatbands and headgear pads wear sooner with daily use; check whether replacements are readily available before choosing a less common model.
Battery arrangements differ. Some helmets use replaceable batteries, some combine solar assistance with a battery, and some have nonreplaceable power components. Confirm the power type and replacement procedure, and store the helmet as instructed. A helmet left in a hot vehicle, dropped onto its lens, or used with a cracked cover plate may need inspection or replacement even if the shell looks intact.
Bottom line
For occasional general-purpose work, choose a reliable mid-range auto-darkening welding helmet with a suitable shade range, adjustable sensitivity, and affordable replacement covers. For low-amp TIG or frequent welding, prioritize verified detection performance, high optical clarity, and comfortable headgear. Choose a larger viewing area when your work benefits from a wider sight line, but weigh that against bulk, balance, and consumable-lens costs. The right helmet is the one whose documented features match your process and whose fit stays secure through the work you do.