What's inside
- Best Auto Arc Welders for Clean, Reliable Welding
- Quick Comparison: Leading Portable Arc Welders
- Best Choice by Welding Situation
- Arc-Start Reliability: What Actually Matters
- Amperage Range and Electrode Compatibility
- Duty Cycle: The Specification That Changes the Buying Decision
- 120 Volts or 240 Volts?
- Ownership Costs and Durability Realities
- Setup Steps for a Cleaner First Weld
- Best Auto Arc Welders for Clean, Reliable Welding
- Quick Comparison: Leading Portable Arc Welders
- Best Choice by Welding Situation
- Arc-Start Reliability: What Actually Matters
- Amperage Range and Electrode Compatibility
- Duty Cycle: The Specification That Changes the Buying Decision
- 120 Volts or 240 Volts?
- Ownership Costs and Durability Realities
- Setup Steps for a Cleaner First Weld
As an Amazon Associate I earn from qualifying purchases. This post may contain affiliate links at no extra cost to you.
What we cover
- Best Auto Arc Welders for Clean, Reliable Welding
- Quick Comparison: Leading Portable Arc Welders
- Best Choice by Welding Situation
- Arc-Start Reliability: What Actually Matters
- Amperage Range and Electrode Compatibility
- Duty Cycle: The Specification That Changes the Buying Decision
- 120 Volts or 240 Volts?
- Ownership Costs and Durability Realities
- Setup Steps for a Cleaner First Weld
Best Auto Arc Welders for Clean, Reliable Welding
The best auto arc welder for most repair work is a portable inverter stick welder with dependable hot start, adjustable arc force, anti-stick protection, and a useful 120/240-volt amperage range; the right choice depends on whether you value low-amp control, long duty cycles, or easy transport more than maximum output.
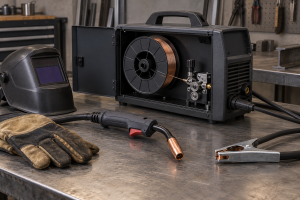
In this article, “auto arc welder” refers to a modern inverter arc, or stick, welder with automatic arc-management features. These machines do not weld without operator input. Instead, their electronics help initiate the arc, stabilize it when the electrode touches the work, and reduce electrode sticking.
As an Amazon Associate we earn from qualifying purchases at no extra cost to you.

Quick Comparison: Leading Portable Arc Welders
| Welder | Amperage range | Input power | Weight | Arc-start and control features | Best suited to |
|---|---|---|---|---|---|
| Hobart Stickmate 160i | 20–160 A | 120/240 V | About 15 lb | Hot start, arc force, anti-stick | General repairs and light fabrication |
| ESAB Rogue ES 180i PRO | 5–180 A | 120/230 V | About 18 lb | Hot start, adjustable arc force, anti-stick, lift-TIG capability | Fabrication and low-amp control |
| Miller Thunderbolt 210 DC | 20–210 A | 120/240 V | About 15–16 lb | Auto-line input compensation, hot start, arc control | Frequent repair work and larger electrodes |
| 160–180 A inverter stick welder, generic class | 10–180 A | 120/240 V | 10–18 lb | Usually hot start, arc force, anti-stick; quality varies | Budget users with occasional projects |
Published specifications can vary by revision and input voltage, so confirm the rating plate and manual before purchase. In particular, duty-cycle figures often change substantially between 120-volt and 240-volt operation.
Best Choice by Welding Situation
| Your situation | Best match | Why | Trade-off |
|---|---|---|---|
| First welder, occasional household repairs | Hobart Stickmate 160i or a reputable 160 A inverter | Simple controls, portable size, enough output for common 1/8-inch electrodes | Limited endurance on long welds |
| Farm, trailer, or equipment repairs | Miller Thunderbolt 210 DC | Higher output and stronger headroom for 1/8- and 5/32-inch electrodes | Requires a suitable circuit for full performance |
| Fabrication with thin and medium steel | ESAB Rogue ES 180i PRO | Broad adjustment range and useful low-current control | Costs more than basic hobby machines |
| Very limited storage or frequent transport | Compact 140–160 A inverter | Many weigh roughly 10–15 lb and fit in a small tool case | Small fans, leads, and cases may be less robust |
| Long production-style welds | A 200 A or larger machine with a high duty-cycle rating | Less waiting for thermal cooldown | Heavier, more expensive, and often needs 240 V |
Arc-Start Reliability: What Actually Matters
Hot start
Hot start briefly increases current when the electrode first touches the work. This helps prevent the common cold-start problem in which the rod sticks before the arc is established. It is especially useful with 6010 and 6011 electrodes, contaminated steel, and outdoor repairs where maintaining a perfect starting angle is difficult.
Arc force
Arc force, sometimes called dig control, automatically adds current when the arc length becomes short. A moderate setting can keep the electrode from going out as you work into a corner or across an uneven joint. Too much arc force can produce a harsh arc, extra spatter, and an undercut edge, so adjustable control is more valuable than simply having an aggressive setting.
Anti-stick
Anti-stick reduces welding current if the electrode remains stuck to the work. It protects the electrode coating and makes removal easier. This feature does not replace correct amperage: an incorrectly set machine can still create poor starts, excessive spatter, or an unstable arc.
For the cleanest starts, prioritize a machine with adjustable hot start and arc force rather than one advertising a high maximum amperage alone.
Amperage Range and Electrode Compatibility
A practical 160–180 A welder can handle a large share of repair work. Typical starting points are approximately 50–90 A for a 3/32-inch 6013 electrode, 80–125 A for a 1/8-inch 6013, and 90–140 A for a 1/8-inch 7018. Actual settings depend on the electrode manufacturer, joint position, steel thickness, and polarity.
- 6011: useful for rusty or painted steel and less-than-perfect preparation; it generally benefits from a forceful, stable arc.
- 6013: easier to control for general mild-steel work and often a good learning electrode.
- 7018: produces strong, neat-looking welds but requires dry storage and better surface preparation.
- 6010: requires a machine specifically capable of its demanding arc characteristics; not every compact inverter performs well with it.
A machine rated at 160 A does not necessarily run every 1/8-inch rod continuously. Check its duty cycle and electrode recommendations, not just the maximum number on the front panel.
Duty Cycle: The Specification That Changes the Buying Decision
Duty cycle is the percentage of a 10-minute period that a welder can operate at a stated current before thermal protection may intervene. For example, a 30% duty cycle at 160 A means three minutes of welding followed by up to seven minutes of cooling at that rated condition.
Consider a repair requiring twelve minutes of actual arc time. A welder rated at 30% at the chosen current may need approximately 28 minutes of total elapsed time: four 3-minute welding periods plus three 7-minute cooling intervals. A machine rated at 60% at the same current could complete the work in roughly 20 minutes, assuming the operator can weld continuously and the rating applies to the selected input voltage.
For occasional beads, a 25–35% duty cycle is usually adequate. For gates, brackets, trailers, or repeated structural repairs, look for at least 40–60% at the current you actually use.
120 Volts or 240 Volts?
120-volt operation is convenient for a garage outlet and can be sufficient for 3/32-inch electrodes and short runs. It often limits maximum current and lowers duty cycle. A 240-volt circuit gives the inverter more electrical headroom, making it more practical to run 1/8-inch and larger electrodes for longer periods.
Before buying, check the circuit amperage, extension-cord requirements, and plug type. A long, undersized extension cord can cause voltage drop and poor arc behavior. If an extension is necessary, use the gauge and maximum length specified by the manufacturer rather than assuming a household cord is adequate.
Ownership Costs and Durability Realities
The welder is only part of the cost. A realistic starter setup may include electrode holders and work clamps if they are not supplied, a properly rated helmet, gloves, jacket, chipping hammer, wire brush, and a dry storage container for electrodes. General market prices range from roughly $150–$300 for basic inverter machines and about $300–$700 for established-brand portable units, before accessories and electrical work.
The parts most likely to wear first are electrode-holder jaws, work-clamp contact surfaces, flexible leads, cooling fans, and power switches. Inspect leads for cuts, hot spots, crushed insulation, and loose terminals. Keep ventilation openings free of grinding dust and blow out the cabinet only as directed by the manual; compressed air used too aggressively can drive debris deeper into electronics.
Store low-hydrogen 7018 electrodes in accordance with the package instructions. Damp rods can produce porosity and hydrogen-related cracking risks, particularly in demanding joints. Keep the workpiece clean: remove paint, oil, heavy rust, and galvanizing near the weld area. Never weld coated metal without appropriate hazard controls and ventilation.
Setup Steps for a Cleaner First Weld
- Identify the electrode and polarity. Follow its package instructions; 7018 and 6010 may require different polarity preferences.
- Prepare bright metal. Grind or wire-brush the joint and create enough access for a consistent travel angle.
- Choose a middle-of-range amperage. Make a short test bead on scrap of similar thickness, then adjust in small increments.
- Set arc-force control moderately. Increase it if the arc repeatedly goes out, and reduce it if the arc becomes violent or overly spattery.
- Strike, establish a short arc, and travel steadily. Excessive arc length is a common cause of spatter and porosity.
- Chip and inspect the slag. Look for consistent width, tie-in at both edges, and visible defects before welding the final joint.
For most shoppers, a reputable 160–180 A inverter is the best balance of portability, automatic arc assistance, and capability. Choose a higher-output 200 A class machine when you regularly use larger electrodes or weld for long periods; choose the ESAB Rogue ES 180i PRO when low-current control and broader fabrication flexibility matter most, and the Hobart Stickmate 160i when simple, dependable repair work is the priority.