What's inside
- Contents
- How MIG Welding Works in a Garage
- Start With Your Electrical Supply
- Types of MIG Welders Compared
- Thickness Range and Duty Cycle
- Shielding Gas Versus Flux-Core
- Features That Matter and Features That Do Not
- Setting Up the Garage Safely
- Who Should Choose What
- Common Mistakes
- Buying and Setup Checklist
- Frequently Asked Questions
- Conclusion
- Contents
- How MIG Welding Works in a Garage
- Start With Your Electrical Supply
- Types of MIG Welders Compared
- Thickness Range and Duty Cycle
- Shielding Gas Versus Flux-Core
- Features That Matter and Features That Do Not
- Setting Up the Garage Safely
- Who Should Choose What
- Common Mistakes
- Buying and Setup Checklist
- Frequently Asked Questions
- Conclusion
As an Amazon Associate I earn from qualifying purchases. This post may contain affiliate links at no extra cost to you.
Short answer: the best MIG welder for a home garage is a machine that runs on the electrical supply you actually have, comfortably covers the thickest steel you plan to weld, and can be run with either shielding gas or flux-core wire. For most hobbyists doing brackets, trailer repairs, and sheet-metal patches, that means a compact 120V unit. If you have, or can add, a 240V outlet and expect to weld thicker plate, a dual-voltage machine gives you room to grow without buying twice.
What we cover
- Contents
- How MIG Welding Works in a Garage
- Start With Your Electrical Supply
- Types of MIG Welders Compared
- Thickness Range and Duty Cycle
- Shielding Gas Versus Flux-Core
- Features That Matter and Features That Do Not
- Setting Up the Garage Safely
- Who Should Choose What
- Common Mistakes
- Buying and Setup Checklist
- Frequently Asked Questions
- Conclusion
Our Top Picks
 YESWELDER Auto Darkening Welding Helmet 1/1/1/1 True Color3.64 x 1.67"1 x 1 x 1 Inches1 PoundsCheck on Amazon
Contents
- How MIG welding works in a garage
- Start with your electrical supply
- Types of MIG welders compared
- Thickness range and duty cycle
- Shielding gas versus flux-core
- Features that matter and features that do not
- Setting up the garage safely
- Who should choose what
- Common mistakes
- Buying and setup checklist
- Frequently asked questions
- Conclusion
How MIG Welding Works in a Garage
MIG stands for metal inert gas, and the process is sometimes called GMAW. A spool of thin wire is pushed through a hose to a handheld gun. When you pull the trigger, the wire becomes the electrode: it carries current to the workpiece, melts, and fills the joint. Either a shielding gas flowing from the nozzle or a flux inside the wire itself keeps air away from the molten puddle so the weld does not turn porous and brittle.
The reason MIG dominates home garages is simple. The wire feeds automatically, so you have one hand free to steady the gun and the other to hold your helmet or position the work. Compared with stick welding, there is no slag to chip on most gas-shielded welds, and compared with TIG there is no foot pedal or second hand feeding filler rod. A beginner can lay a presentable bead in an afternoon, which is why MIG is the default recommendation for first machines.
Start With Your Electrical Supply
Before comparing any machine, look at your garage panel and outlets. Electrical supply is the one constraint you cannot talk your way around, and it decides which category of welder is realistic.
120V machines
These plug into a standard household receptacle. They are light, affordable to run, and portable enough to move between garage and driveway. Most manufacturers specify a dedicated circuit, often 20 amps, and many state a minimum breaker size in the manual. Sharing the circuit with a freezer, a garage door opener, or a shop vacuum invites nuisance tripping. Read the plate on the machine and the owner’s manual for the exact requirement rather than assuming any outlet will do.
240V machines
A 240V welder draws less current for the same power and can sustain higher output, which is what lets it handle thicker steel and longer runs. The catch is the outlet. A dryer or welder receptacle may already exist in your garage, but the plug type and breaker rating must match the machine. If you need a new circuit, hire a licensed electrician; this is not a place for guesswork, because undersized wire and wrong breakers are fire hazards.
Dual-voltage machines
Dual-voltage welders accept either supply, usually by swapping a plug or adapter. They suit people who have only 120V today but may add 240V later, or who rent a workshop with different outlets than home. The trade-off is usually higher purchase price and more weight than a basic 120V unit.
Types of MIG Welders Compared
Machines fall into a handful of broad categories. The table below compares them by type rather than by brand, because the right category matters more than any individual model.
| Type | Typical power input | Best for | Main trade-off |
|---|---|---|---|
| Compact 120V, flux-core only | Household outlet | Light repairs, gate and fence fixes, occasional use outdoors | No gas option, more spatter, thin metal is harder |
| Compact 120V, gas and flux-core | Household outlet | Sheet metal, brackets, automotive patch panels, learning | Limited thickness, modest duty cycle |
| Dual-voltage MIG | 120V or 240V | Mixed projects, hobbyists who want to grow | Higher cost, heavier to move |
| 240V dedicated MIG | 240V outlet | Thicker steel, frequent or long welding sessions | May require new wiring, less portable |
| Multi-process (MIG, TIG, stick) | Varies by model | One machine for several processes | More settings and accessories to learn |
A flux-core-only machine is the cheapest way in, but you give up the cleaner, lower-spatter results that gas-shielded MIG delivers on thin material. If you expect to weld auto body panels or light tubing, make sure the machine has a gas solenoid and regulator connection, even if you start with flux-core wire and add a bottle later.
Thickness Range and Duty Cycle
Reading the thickness rating
Manufacturers publish a maximum material thickness, often with separate figures for gas and flux-core and for single-pass versus multi-pass work. Treat the maximum as a ceiling, not a target. A machine working at its limit tends to produce cold, poorly fused beads that look acceptable but lack penetration. As a practical rule, choose a machine whose rating comfortably exceeds the thickest metal you expect to join regularly, and prepare thicker pieces with beveled edges and multiple passes instead of hoping one pass will do.
Duty cycle explained
Duty cycle is expressed as a percentage of a ten-minute window at a stated output. A rating of 20 percent at a given amperage means the machine can weld for about two minutes and then needs roughly eight minutes to cool. Past that, an internal thermal protector shuts it down until it recovers. That is not a defect; it is the protection working.
Two points are easy to miss. First, duty cycle falls as amperage rises, so the headline figure only applies at its stated setting. Second, most garage welding is short: tack, weld a few inches, reposition, grind, repeat. A modest duty cycle is often fine for that rhythm. If your projects involve long continuous seams, such as tank work or full-length frame rails, look for a higher percentage at the amperage you will really use.
Shielding Gas Versus Flux-Core
This decision shapes your running costs, your weld quality, and where you can work, so it deserves more than a passing glance.
Solid wire with shielding gas
Gas-shielded MIG uses solid wire and a bottle of shielding gas. For mild steel, a common choice is a blend of argon and carbon dioxide, widely sold as a 75/25 mix. This setup produces smoother beads, minimal spatter, and little to no slag, which makes cleanup quick and makes thin metal manageable. The downsides are the cylinder itself, which you must buy or lease and refill, plus sensitivity to wind. A breeze of even a modest strength can blow shielding gas away from the puddle and cause porosity, so close the garage door on the windward side or use a windshield.
Self-shielded flux-core wire
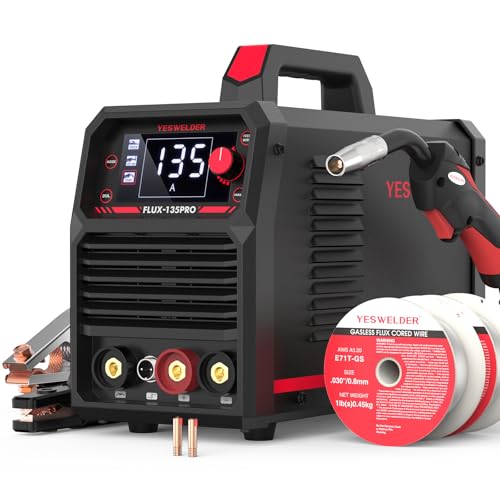
Flux-core wire contains a flux in its center that burns to produce a protective atmosphere and a slag coating. No bottle, no regulator, and good tolerance for outdoor conditions make it attractive for repairs on a farm, in a driveway, or on a trailer. It runs hotter and penetrates well on slightly dirty or rusty steel, but it produces more spatter and smoke and leaves slag to chip off. Flux-core generally runs with reversed polarity compared with solid wire, so check the manual and make sure your machine lets you switch.
| Factor | Gas-shielded solid wire | Self-shielded flux-core |
|---|---|---|
| Weld appearance | Cleaner, less spatter | Rougher, slag to remove |
| Thin sheet metal | Better suited | Harder to control without burn-through |
| Wind tolerance | Poor | Good |
| Startup equipment | Bottle, regulator, hose | Wire only |
| Fume and smoke | Lower | Higher, ventilation is critical |
| Dirty or rusty metal | Needs good cleaning | More forgiving |
A machine that accepts both gives you the best of each. Many beginners start with flux-core because it is cheap to begin, then add a gas bottle once they want neater welds on thin parts. Whichever you choose, match the wire diameter to the machine’s drive rolls and to the metal. Thinner wire suits thin stock and lower-power machines, while thicker wire carries more current for heavier work. Always confirm what diameters your model supports.
If you are gathering a starter kit, browse compact MIG welders and compare the input requirements and wire support against the checklist further down.
Features That Matter and Features That Do Not
Features worth paying attention to
- Wire feed quality: an unreliable feeder is the top source of frustration. Look for a sturdy drive mechanism, accurate tension adjustment, and drive rolls sized for the wire you plan to use. Poor feeding leads to birdnesting, where wire tangles at the drive rolls.
- Adjustable voltage and wire speed: finer control beats a few coarse presets. If you are new, a settings chart inside the door is genuinely useful.
- Synergic or guided settings: some machines suggest parameters once you pick material and thickness. These help beginners but are not essential once you learn how the arc should sound.
- Easy consumables: contact tips, nozzles, and liners are wear items. Choose a machine that uses common, readily available parts.
- Spool gun readiness: aluminum wire is soft and tends to jam in a long liner. If aluminum is in your future, confirm the machine supports a spool gun accessory.
Setting Up the Garage Safely
A good welder in a poor workspace is a risk. Spend as much thought on the space as on the machine.
Fire prevention
Sparks and hot spatter travel farther than people expect and can smolder in sawdust, rags, and cardboard long after you stop. Clear everything flammable from the area, including gasoline cans, paint thinners, aerosols, and stored papers. Keep a suitable fire extinguisher within reach and know how to use it. After you finish, check the area again for smoldering material.
Ventilation
Welding produces fumes and gases that you should not breathe. Open the garage door, position a fan so that it moves fumes away from your face rather than past it, and avoid welding in a closed space. Be especially careful with galvanized or coated metal, which releases harmful fumes when heated; remove the coating at the weld area first or avoid welding that material. Follow the safety guidance in your machine’s manual and local regulations.
Personal protective equipment
You need an auto-darkening helmet with the correct shade range for the process, welding gloves, a flame-resistant jacket or heavy cotton long sleeves with no synthetic fabric that melts, closed leather boots, and safety glasses worn under the helmet. Pair your machine budget with a safety budget; for a start, see auto-darkening welding helmets and fitted gloves.
Who Should Choose What
| Your situation | Sensible category | Reasoning |
|---|---|---|
| Complete beginner with a standard garage outlet | Compact 120V, gas and flux-core capable | Low entry cost, flexible, forgiving to learn on |
| Automotive hobbyist working on thin panels | Gas-capable machine with fine voltage control | Thin metal needs low heat and clean beads |
| Farm or yard repairs outdoors | Flux-core capable, good portability | Wind tolerance and no gas bottle to haul |
| Fabricator building frames and carts | Dual-voltage or 240V | More heat for thicker material and longer sessions |
| Hobbyist who wants to try aluminum and stainless later | Multi-process or spool-gun-ready model | Flexibility without separate machines |
| Renter with limited electrical options | Compact 120V or dual-voltage | Works with what is available, easy to move |
Common Mistakes
- Buying on amperage alone. Duty cycle, input voltage, and feeder quality shape real-world performance more than a maximum amp figure.
- Ignoring the electrical panel. A welder that trips the breaker every few minutes is not a bargain. Verify circuit capacity before you buy.
- Welding dirty metal. Mill scale, paint, oil, and rust cause porosity and weak welds. Grind to bright metal at the joint.
- Using the wrong settings. A sizzling, popping arc often means wire speed is too high or voltage too low. A smooth, steady crackle, similar to frying bacon, is what you are listening for.
- Skipping practice. Run beads on scrap of the same thickness before touching a real part, and cut or bend-test your practice welds to see whether they truly fused.
- Neglecting ventilation and fire safety. These are the mistakes that cause real harm.
Buying and Setup Checklist
- Confirm your outlet voltage, breaker size, and whether the circuit is dedicated.
- List your most common materials and the thickest piece you expect to weld.
- Decide on gas, flux-core, or both, and budget for a cylinder, regulator, and wire.
- Check the duty cycle at the amperage you will actually use.
- Verify that consumables and drive rolls are easy to find and replace.
- Choose an auto-darkening helmet, gloves, flame-resistant clothing, and safety glasses.
- Prepare a non-flammable work area with a metal table or cart, a fire extinguisher, and good airflow.
- Gather clamps, a wire brush, chipping hammer if using flux-core, and angle grinder for prep.
- Practice on scrap steel and test your welds before building anything that matters.
A cart and clamps make a big difference to comfort and weld quality, so consider welding carts and clamps as part of the first purchase rather than an afterthought.
Frequently Asked Questions
Can I run a MIG welder on a regular household outlet?
Many compact machines are designed for 120V outlets, but they commonly need a dedicated circuit of a specific amperage. Check the manual for the required breaker size and avoid long or thin extension cords, which cause voltage drop and unstable arcs.
Is flux-core or gas MIG better for a beginner?
Gas MIG usually gives cleaner results on thin metal, while flux-core is simpler to set up and handles light wind. A machine that supports both lets you try each and decide based on the work you do most.
How thick of steel can a home MIG welder handle?
It depends on the machine’s input power and output. Check the manufacturer’s stated range and choose a unit rated above your thickest typical project. For thicker material, bevel the joint and use multiple passes.
Do I need special ventilation in a garage?
Yes. Welding produces fumes, so open the door, use a fan to move air away from your face, and never weld galvanized or unknown coated metal without removing the coating and following safety guidance.
What does duty cycle mean for hobby use?
It is the share of a ten-minute period the welder can run at a stated output before it must cool. Hobby work with short welds rarely hits the limit, but long continuous seams will, so check the figure at your working amperage.
Can I weld aluminum with a basic MIG welder?
Aluminum is possible with the right setup, which typically includes pure argon, the correct wire, and often a spool gun. Basic flux-core machines are not suited to it. Confirm that your model supports the needed accessories first.
Should I buy a bigger welder than I need?
A little headroom is wise, but a machine far beyond your needs costs more and may require electrical work. Choose for your realistic projects, and consider dual-voltage if growth is likely.
Do I need training before I start?
Self-teaching on scrap is common for non-critical projects, but a short class from a community college or welding shop speeds learning and builds safe habits. For structural or load-bearing parts, get proper training or hire a qualified welder.
Conclusion
Picking a MIG welder for a garage comes down to a few honest questions. What power can the space supply? What is the thickest metal you will regularly join? How long do your welds run? Will you work indoors with gas or outdoors with flux-core? Answer those, and the field narrows quickly to one category of machine. From there, favor smooth wire feeding, easy-to-find consumables, and a duty cycle that fits your rhythm over eye-catching specs.
Finally, remember that the machine is only part of the setup. A proper helmet, gloves, protective clothing, ventilation, a fire-safe work area, and time spent practicing on scrap will do more for your results and your safety than any upgrade in welder size. Start modestly, learn the process, and expand when your projects demand it. For safety gear that complements your purchase, you can review welding safety gear before your first arc.
As an Amazon Associate, we earn from qualifying purchases. This comes at no extra cost to you.
